
 Spring is finally upon us and if you are like me, this means it is finally time to put the snow blower away just in time to break out the tiller. This is the perfect time of year to get an early start on preparing all of your gas powered equipment for what is sure to be yet another grueling season.
If you were smart and did the right thing at the end of last summer, all of your power equipment should be sitting in the garage or shed with the gas drained out of the tank and carburetor, ready to go. Of course if you are like me, you probably turned each of them off and put them in their spot in the garage. There they sat until now doing little more than gathering dust and the mysterious junk that gets piled on them no matter how hard you try not to let it happen.
Now that Spring is Here
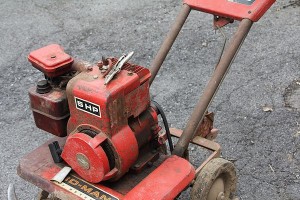
Now that spring has finally reared its beautiful head, all thoughts turn towards getting the garden ready for planting. This means dragging out the tiller and getting ready to go. Ours is an older timer circa somewhere in the 60s or maybe early 70s. We found a listing on our local Freecycle for someone giving away an old tiller and riding lawn mower. So far I have managed to get the tiller running, next on my list is the mower.
Now is the perfect time to drag out the gas powered equipment and give it a good once over. The more you do now before the season kicks in, the less trouble you are likely to have when the season really gets going. General maintenance of these pieces of equipment is something that can be done by anyone who can use a few simple hand tools. Among these are:
- A Phillips screwdriver
- A slotted screwdriver
- A pair of pliers
- A pair of wire cutters
- A sharp knife
- A hammer
- A file
- A small hand electric grinder
Most of us own at least this much as part of our collection of tools, the only thing you may not have is the small hand grinder, but you can easily pick one of these up at your local do it yourself store for less than $50. A word of caution here, if you are going to use a grinder, you need to buy a pair of safety goggles or glasses and USE THEM! You only have one pair of eyes and the metal filings and sparks from a grinder can cause SERIOUS eye injuries and rob you of your sight.
Your Garden Awaits
If you garden is like ours, it sat all winter long growing a great crop of weeds and grass. The first thing we reach for in the spring is our trusty tiller. There was a time when we turned it all over by hand, but now our garden has simply become too big to do this or maybe I am just getting a little too old. In either case we are now the proud owners of a gas powered tiller.
Getting the tiller ready each spring involves cleaning, lubing, changing the oil, and more long before you pull the rope for the first time.
 Cleaning
If all you did was roll the tiller into your garage at the end of the year, you’ve got some serious cleanup to do before getting started. A good wash with the garden hose will get you started off on the right foot. But before you do this take some plastic wrap and rubber bands, cover the air filter housing and muffler. This will prevent any water from getting into the engine where it can cause serious problems.
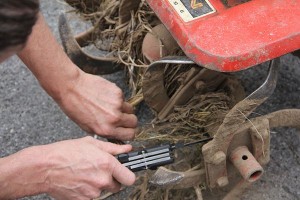
Once you have washed and scrubbed the buildup of dirt from your tiller, grab a sharp knife and cut away weeds, strings, and buildup that has gather around the tines and the drive shaft. While your tiller may still run with this buildup, it will slow it down, make it work harder and if you let it get too big cause your tiller to not do a good job.
Prepping the Tines for another Season
While you are looking at the tines, look for damage such as chips or dings in the leading edge, bent tines and broken mounts. If the tines are bent, crack or have broken mounts, you will need to replace them. While bent tines will not necessarily cause any serious problems, they can make your tiller hard to handle.
Depending on how new your tiller is you may be able to straighten slightly bent tines. In order to this, you will have to remove them from the drive shaft. Most newer machines have a shear pin that holds them on, you will need to use a hammer and punch to drive the pin out. If you do not damage the pin, you can reuse it, but if you do it will need to be replaced.
 You can use a small sledgehammer to straighten stamped steel tines. But if your tiller is like my old timer, the tines are made from thick cast steel and must be heated up using a torch in order to straighten them. Unless you have a set of oxy acetylene welding torches on hand, you might want to take these tines to someone do the work for you.
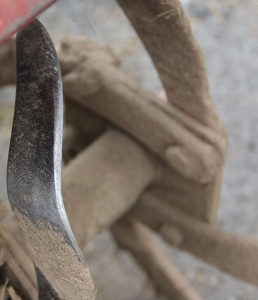
Sharp tines will cut through the weeds and soil far more easily. This does not mean you need the same sharp edge as your lawn mower blade, but your tines still need an edge. You can use a good file to take out the nicks and dings from last year and put an edge on the leading edges of the tines or you can use a small (4 inch) electric hand grinder. If you are going to use a grinder, you MUST WEAR your SAFETY GLASSES.
Start working from the bend in the tine towards the tip, whether you are sharpening by hand or with a grinder. The idea is to keep the original cutting bevel as this is considered the perfect angle to get the job done. You should only file or grind long enough to remove the nicks and put a cutting edge back on the tines. Remember, you are going to be doing this every spring, if you take too much off it won’t be long before you have to buy new tines.
Taking Care of the Drive
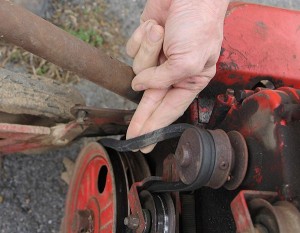
If your tiller is like mine and belt driven, you need to examine the belt or belts for frayed edge, pieces missing or any other signs of damage. Replacing them before you get started will save you a lot of frustration compared to breaking a belt in mid tilling session. Examine the pulleys and tensioners for damage and spin any free running pulley by hand to make sure they roll smoothly. If you have any that feel rough, replace them now as damage pulleys or bearings can destroy your belts.
 The tines of your tiller are attached to a shaft that then connects to a drive unit and the shaft the belts turn. This is a good time to see if there are any grease fittings that need to be pumped full of grease. You can pick up a grease gun at any auto parts store along with a tube of grease. As a good rule of the thumb, you should pump grease until you can see it coming out of the ends of the shaft. This way you know there is plenty in there and you have flushed out the old grease and dirt.
The drive unit may also be filled with gear oil that must be checked, there should be a plug on the face or side that you can take out. If there is a dipstick, all you have to do is add enough gear oil to reach the full mark. If not just fill it until the oil reaches the bottom threads and that should be fine.
Cables, Controls, and Shutoffs
This a good time to check the operation of all cables, controls, and shutoffs. For the most part all you really need to do is make sure everything works smoothly. If there is too much slack in any cables you may be able to adjust them, if not you may need to replace them. Whether you have a key switch, a simple toggle switch or a kill button, you need to make sure it works properly. This is VERY IMPORTANT from a safety point of view as you need to be able to shut your tiller down immediately in an emergency.
The Engine the Heart of Your Tiller
Spring is the best time of year to do an oil change on your tiller’s engine. If you have the owner’s manual it will tell you where the drain is, but on most models it located on the bottom of the engine or at the bottom of side. Drain all of the old oil into a container that can be taken to a nearby auto parts store for disposal. Refill with fresh oil, your owner’s manual will tell you what type to use. If you do not have a manual, you should be able to find one online.
If you ran your tiller out of gas at the end of last summer, you should be able to fill the tank with fresh gas and be ready to go. If not you need to drain the old gas from the tank and carburetor. In order to do this, you need to disconnect one end of the hose that runs from the tank to the carburetor and let the gas flow into a container.
Finding the Location of your Sparkplug
On the bottom of the carburetor there should be one or two screws. If there is only one, you need to remove it and let the fuel drain out. If there are two, one in the middle and one on the edge, remove the one on the edge and drain out the old fuel. Put everything back together and fill the tank.
The only thing left is to replace the spark plug, and you should be ready to face a new season. But before you pull the rope for the first time, give your tiller a good once over. You should be looking for loose nuts and bolts, or signs of damage. Once you have done all of this you should be ready for spring tilling and planting. The good news is that despite this huge post, it should take you no more than an hour or two to do everything on this list.
Leave a Reply